نحوه استفاده از دستگاه تست فشار رادیاتور
M. Mehrabi Expert
Heavy Machinery
How to Use a Radiator Pressure Tester
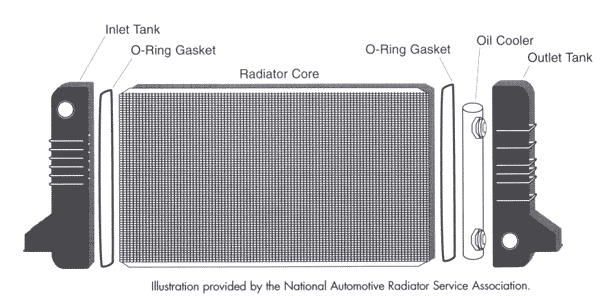
The radiator and cooling system on a vehicle are responsible for cooling the internal components of the combustible engine. To operate, the engine encounters several small controlled explosions in the cylinders per second. Combined with internally moving parts, friction also applies heat. To cool the engine, the radiator and cooling system work under pressure in a sealed environment. Boiling temperature of the system is increased due to the sealed pressure. If a leak occurs, internally or externally, or if pressure is lost, the boiling temperature decreases and the engine will overheat.
Difficulty: Moderately Easy
Instructions
Things You'll Need
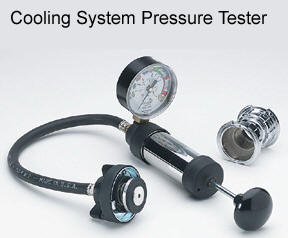
Radiator pressure tester with suitable neck adapters
Drain Hot steam
Coolant
1
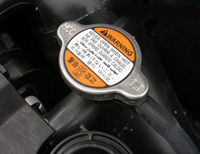
Ensure the engine is cold before attempting to check the pressure on the radiator. Slowly remove the radiator cap by pushing down and then turning it counterclockwise until the locking tabs on the cap release. Some caps my offer a flip-top pressure release valve on top of the cap. If so, lift the pressure release valve upward to release the pressure inside.
2
Look on the top of the radiator cap to discover what the exact psi pressure rating is for the vehicle.
3
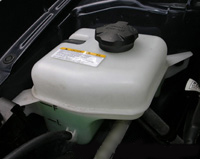
Make sure the radiator and coolant reservoir bottle are full of coolant to the maximum fill line. Radiators should be filled to just below the top of the cap and reservoir bottles will have a full-cold indicator line. Some vehicles use the reservoir as the pressurized chamber to run directly to the radiator.
4
Apply the attached radiator cap extension of the pressure tester to the radiator. Different makes and models of cars may come with different sized radiator necks and caps. Most pressure testers come with a couple adapters of the most common ones used, but in some cases with imports, a special adapter might have to be employed. The adapters screw onto the radiator neck and then the top of the adapter fits the standard radiator cap extension of the pressure tester. Make sure if an adapter is employed, it is screwed onto the neck of the radiator properly and tightened. Make sure the radiator cap extension of the pressure tester is screwed on securely and tight.
5
Pump the cylinder handle of the radiator pressure tester while watching the psi gauge. Do not exceed the psi pressure listed on the radiator cap. Internal seals or weak hoses can burst if too much pressure is applied. Once the desired pressure is obtained, gently rest the pressure tester on the frame rail or radiator rail. Visually inspect all around the radiator and around the bottom of the engine area under the vehicle for any visible signs of dripping or leaking. This tester under pressure will reveal any small leaks and help you identify the failed component. Heater cores, part of the cooling system, are internal between the firewall and floorboard on the passenger side of the car. You won't be able to see the hoses or the core leak under a pressure test, but you'll be able to smell coolant inside the passenger cab of the vehicle.
6
Allow a few minutes to go by and check the psi gauge on the pressure tester. If no leaks are apparent and the tester has maintained the applied pressure, the system is okay. However, if the pressure is less than a couple notches away from the applied pressure setting, there may be an internal problem with the head gasket or heater core.
7
Release the pressure on the pressure tester before removing the cap. Again, pressure is now built up inside since you manually purged it in. Removing the cap of the tester before releasing the pressure will result in coolant spraying everywhere. Some testers have a pressure release rod or valve. Other cheaper models may simply employ manually and gently tipping the cap on the radiator neck to release the pressure slowly. When the psi gauge reads zero pressure, you can safely remove the cap and/or adapter, if applicable. Replace the radiator cap.
Tips & Warnings
راهنمایی
Another test you can perform with the radiator pressure tester is to reveal what the actual pressure is under operating temperature. To do this, apply the pressure tester to the radiator and then start the vehicle up with the psi gauge at zero. Allow the vehicle to get to normal operating temperature and then read the psi gauge.Allow the vehicle to fully cool down before removing the pressure tester.
Most radiators are only rated for 15 psi (pounds per square inch) of internal pressure. Although not much, coolant can spurt from the radiator neck if the system cannot purge the pressure along with the coolant if not allowed to escape slowly first.
Resources

تست فشار مایع خنک کننده
Testing the coolant pressure
Internal Coolant lost, external coolant lost, white smoke, coolant rising in expansion tank with brownish color, lost of oil, oil level rising, color of oil changing, engine temperature rising (Especially at high speed / freeway). These are all symptom of a head gasket or coolant system failure.
This can be tested with a leak down test and / or a coolant pressure test.
Note: Contrary to popular believe, an engine produce more energy (and heat at the same time) at high speed (freeway) than at idle or slow speed. So more adequate / perfect cooling is needed. Pressure lost often happen in that condition.
The problem “could be” that pressure is building up in the cooling system. This is due to the head gasket (the 2 round one found each side) at the top of the cylinder leaking compression. If the to bottom inner round gasket fail, you will mostly get coolant in the engine oil or oil in the coolant. Normally this symptom happens when the engine is cold but if you have a major leak at the inner head gasket this will happen at any temperature. When I did my heads I had more than 15lb of pressure in the cooling system. So that means that my inner head and outer head gasket had failure (I had a small leak on the right side). The following are a summarization of 2 tests I found a year ago on Boston Bob engine web site, they are reliable test (test it myself). Remember that the coolant flow is low even at high RPM. The more the engine rise in temperature, more the pressure is high

TEST # 1: تست فشار برای سیستم خنک کننده
TEST #1: Pressure Tests for the Cooling System
The first test of the cooling system is done when the engine is cold. A cooling system pressure tester can be installed in place of the radiator cap. Pressure in the cooling system and hot coolant are not something to be treated lightly. Use caution, and never remove the radiator cap from an engine that has been run even for even a short time. After installing the gauge, pump it up to 10 pounds. Look around for leaks if the gauge shows any pressure loss. Common trouble spots include heads, hoses, water pump and rear heater core. If you smell something sweet when you turn the heater fans on, it may be a coolant leak at one of the heater cores, or simply the O-ring at the rear heater valve leaking. Because there is often more then one leak in the system, it is necessary to continue pressure testing until the system holds pressure

تست 2
TEST #2
Start the engine cold with no pressure indicated on the gauge. The pressure in the cooling system builds to aprox 7 lbs at normal running temps looking around for leaks. But if the pressure builds quickly to around 15 lbs the pressure is coming from one of the cylinders through the inner head gasket. This can also show up as a coolant pressure loss in the first test. In extreme cases the cylinder can fill with coolant, and will not turn over. This is know as hydraulic lock, and if you suspect this pull the spark plugs and tries to turn the engine again. Pulling the plugs from the engine allows water to escape from the spark plug holes.

نظرات شما عزیزان:


